

Who am I?

- ~Iffy~ @ StayAtHomeNation
- Hi, I'm Cameron (aka Iffy), a stay at home mother to 4 beautiful children. My family is my life! I am not crafty by nature....but I am learning =D I will share my experiences with you(good & bad) with crafts, DIY, cooking, and life. I say what's on my mind, and remain honest, it's just who I am. Love it or leave it =D So follow me and see my progress as I document my journey, and If All Else Fails....at least you have gained a friend and gotten some great tips or maybe learned something new along the way!
Tuesday, May 10, 2011
Sweet Tooth Satisfaction # 1 ~ Homemade Icing
It's been so busy here lately & I haven't had much free time.
However, you can count on a post from me at least once a week, more if I have the time.
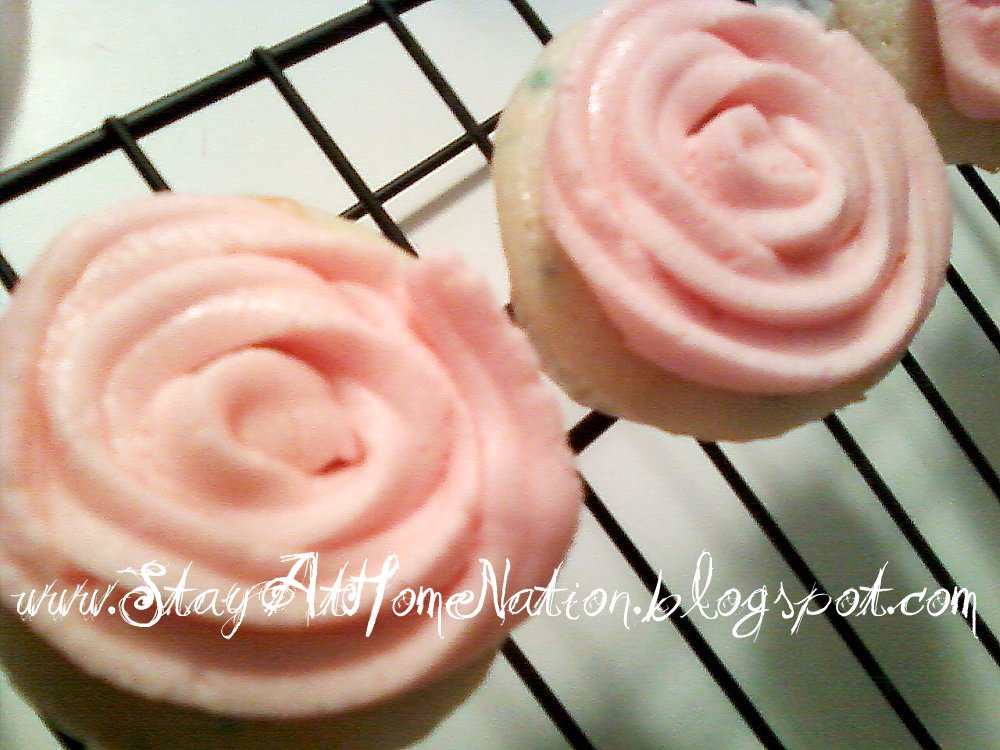
 Today I am going to share with you my homemade icing recipe. Don't they look yummy?
However, you can count on a post from me at least once a week, more if I have the time.
I made these little cupcakes for Sydney & her class today to celebrate her 7th birthday.
Yay Happy Birthday!
For the Icing you will need:
1/2 cup(1 stick) butter, softened
1/2 cup solid vegetable shortening
1 teaspoon vanilla extract
4 cups sifted powdered sugar
2 Tablespoons milk or water
For the Icing you will need:
1/2 cup(1 stick) butter, softened
1/2 cup solid vegetable shortening
1 teaspoon vanilla extract
4 cups sifted powdered sugar
2 Tablespoons milk or water

and set aside.


If you don't have a sifter(or like me and hate using it)
then put the powdered sugar in a wire strainer & with a wire whisk just stir it around until it's all sifted through.
Or you can even skip the strainer & just stir it with the whisk but for something like this I like it to go through the strainer.

add your 1 tsp vanilla and mix.

Then gradually add the powdered sugar to the creamed mixture.
(I use 3 spatulas worth at a time or you can add 1 cup at a time)
 Beat well on medium speed, and be sure to scrape the sides & bottom often.
Once all the powdered sugar is added it will look pretty dry
 add 2 Tbs water or milk(I use water so I don't have to refrigerate it).
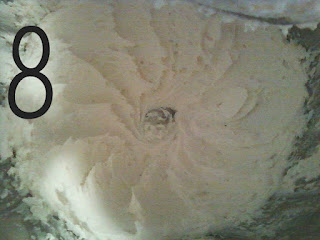 Beat on medium-high speed until light & fluffy(this does not take long at all).
 Then you can either keep it white or add food coloring
(I used 6-7 drops of red to make this light pink as requested from the birthday girl).
You can even split it up and make several colors, because this makes quite a bit.
 Then I put it into my nifty little piping bag with a 3 star tip(not sure the correct term).
I got the whole kit with assorted tips from Ikea for pretty cheap, just to see if I liked it, which I do.
Although I would like to upgrade since I seem to be using it more often & need one that will last longer.
 Here is the end result.
Cute & yummy =D
And it freezes well too!
Hope this satisfies your sweet tooth for now....
until next time,
~Iffy~
Oh and a BIG thanks to all of you who linked up to my very first party! I will be hosting a link party or two & a giveaway once a month. So check in often & follow my blog to stay posted because I have some really great giveaways coming up-stay tuned.
I'm partying with
(I use 3 spatulas worth at a time or you can add 1 cup at a time)

Once all the powdered sugar is added it will look pretty dry


(I used 6-7 drops of red to make this light pink as requested from the birthday girl).
You can even split it up and make several colors, because this makes quite a bit.

I got the whole kit with assorted tips from Ikea for pretty cheap, just to see if I liked it, which I do.
Although I would like to upgrade since I seem to be using it more often & need one that will last longer.

Cute & yummy =D
And it freezes well too!
Hope this satisfies your sweet tooth for now....
until next time,
~Iffy~
Oh and a BIG thanks to all of you who linked up to my very first party! I will be hosting a link party or two & a giveaway once a month. So check in often & follow my blog to stay posted because I have some really great giveaways coming up-stay tuned.
I'm partying with


Subscribe to:
Post Comments (Atom)
Popular Posts


This is so yummy! Linking this up with us made the Creative Bloggers' Party & Hop better and more special. Thank you!
ReplyDelete@SJ @ Homemaker On A Dime=D
ReplyDelete