

Who am I?

- ~Iffy~ @ StayAtHomeNation
- Hi, I'm Cameron (aka Iffy), a stay at home mother to 4 beautiful children. My family is my life! I am not crafty by nature....but I am learning =D I will share my experiences with you(good & bad) with crafts, DIY, cooking, and life. I say what's on my mind, and remain honest, it's just who I am. Love it or leave it =D So follow me and see my progress as I document my journey, and If All Else Fails....at least you have gained a friend and gotten some great tips or maybe learned something new along the way!
Monday, April 18, 2011
Bedside Table redo.....with spray paint?
So my 6 year old daughter's bedside table needed help BADLY....
here what I started with
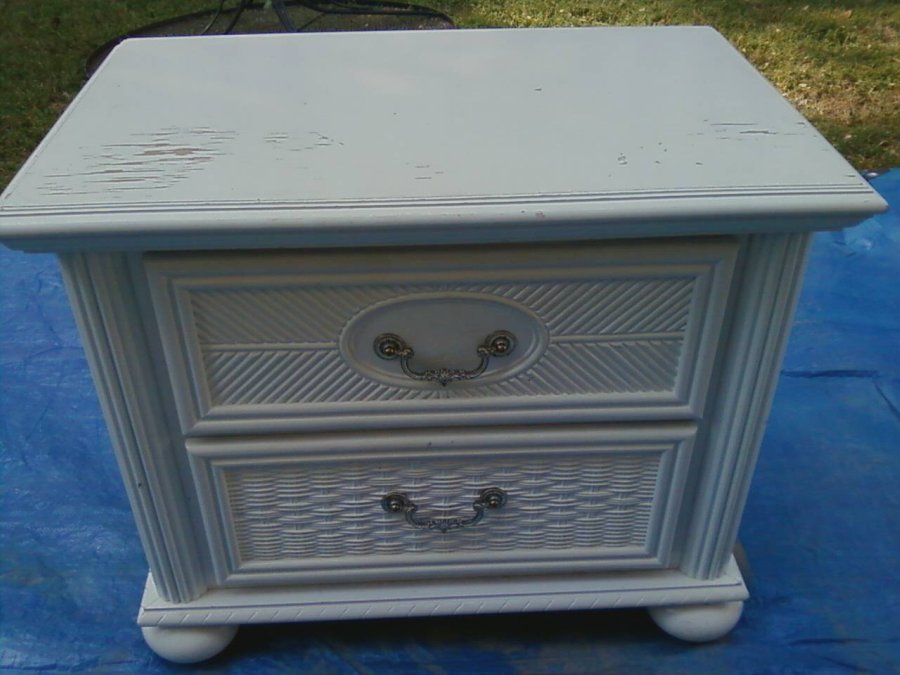

This is a great example of why to use coasters =) The paint was peeling up & looked horrible.
You see, my daughter's bedroom set was mine when was from like 8th grade on so it's pretty old....not like I'm old or anything(oh hush) lol
Anyways when I say I'm new to crafting, refinishing, diy.....I mean
I've really never done them.
I researched the Internet on how to redo wood furniture, what to use, & techniques
and I just kinda came up with my own method based off of my memory from what I researched.
So I embarked on my journey of attempting to use spray paint to redo a small piece of furniture.....
can this be done I thought?
The questions I had were
how well would it hold up being in a 6 yr old's bedroom,
how well would it look once completed, &
how many cans of paint would it take?
Tons of people have redone furniture with spray paint with awesome results,
so I figured what the heck, I'll give it a go.
Here's what I did:
Warning! Lot's of pictures & explanation because that's how I learn best
(when I'm not able to learn hands on) so I figure some of you may be a visual learner too.
I picked up my hubby's Dewalt hand sander(first time ever using it might I add)
and sanded (with an 80 grit pad) most of it down to the wood
(mostly the flat surfaces which was what I felt comfortable with)

Looking better already =D
The rest I lightly sanded with a piece of 120 grit sand paper until I just gave up and figured the primer would do just fine.
So I primed the whole thing after wiping it down with pine-sol & water to make sure it was clean & sand free. Once dry,
I sprayed 2 coats which used a whole can of white primer spray paint
(threw it out before I remembered to take a picture. It was Bullseye 123 White Primer)

Then with a can of Krylon white spray paint and the nifty Comfort Grip spray paint nozzle attachment,

I sprayed it with 2 coats which used the whole can as well.

Up to this point it had taken about 3 hours(dry time included)
I waited about 30 minutes between coats to make sure it was plenty dry even though the spray paint said 'quick dry' I just didn't want to take any chances,
plus there were babies to feed & baths to get ready so I called it a day.
I did the rest in the garage over the next couple of days as I could only work when I had the free time.
I started to sand the hardware but wasn't really feeling it was doing much so I tossed that and began to prime.

I sprayed 2 coats of primer (waiting 15 minutes between coats) oh and I started with the undersides.
I used the above primer(different from what I primed the wood with) and after drying overnight I sprayed 3 coats of the Krylon Oil Rubbed Bronz(aka ORB).

Primed

ORB.
You don't really get what all the fuss is over the ORB until you see for yourself...

...the pictures don't do em justice.
I first read about ORB spray paint over at Full of Great Ideas & saw the amazing transformation Stephanie did with brass doorknobs, something else I will tackle one day.
I wasn't quite happy with just the white spray painted piece, so I used some left over paint from my daughter, Sydney's bedroom walls to accent.
It's a soft pink and I love the color on her walls
(doesn't say the name of the color on the can but it does have the formula on the label if you want it).

See how light it is, so pretty.
But, I wasn't done there. I used some flat oops Valspar paint from Home Depot that I purchased for only $2.50(originally $15) Yay!
It's a Brownish-gray & goes great with my daughter's bedroom as she has a pink & brown comforter & a dark brown dresser as well.
I used that paint to do some detail work with a small brush, as these accents are too pretty to just leave white and 'blend in' or get lost in all that white.
Don't cha think?

I got in a hurry & so I made a few mistakes.....but went back and touched those up.
I also decided in the touch up phase to repaint the white on the drawers.
I used a semi gloss white trim paint we had left over from when we moved into our house almost 3 years ago.
Frog tape really does a great job btw.
Let me just say, I LOVED how the paint went on so smooth & shiny & bright!

I decided right then & there that although the spray paint was pretty easy & fast I would not use it again for furniture....
well except for hardware.
The white spray paint dried dull or flat looking(I used satin so maybe that's why).
Regardless,
I will definitely take the time to hand paint the next entire piece of furniture that I redo.
I used a clear glaze spray on the hardware to finish those up & protect them from chipping.
Once dry I put it all back together &
there she is....

Not bad for my first furniture redo piece right?
Well I think it's adorable and just what my daughter's room needed.
She also has a chest of drawers I will do to match this....
when I get the time of course =D
So.... this just proves that any inexperienced person can turn this
into this...

Do you like it?
How do you think I did for my first time?
~Iffy~
I'm Linking up with


Subscribe to:
Post Comments (Atom)
Popular Posts


I bet your daughter loves her 'new' bedside table. You painted it so awesome-ly!!
ReplyDeleteMoe
www.moethesoutherngal.blogspot.com
@Moe Thanks so much =D I think I was more excited about it then she was lol go figure, that's a 6 year old for ya I guess. Thanks for stopping by, cute pups by the way =)
ReplyDeleteThis is very cute! Looks so Frenchy...like you'd find it in Eloise's bedroom!
ReplyDeleteHey, stopping by from Amaze me August & following now. Can't wait to see the chest of drawers when you do those. Most impressive job.....you have the knack to be "wickedly crafty".
ReplyDeleteHey, thanks so much!!! I am trying =D Nice to meet ya & thank you for following, welcome =)
ReplyDeleteVery cute! I've never painted furniture before so I think you did a great job for your first time. You are really talented!
ReplyDelete@Lil Nell's HomeAww you're so sweet, thank you very much! Thanks for checking out my blog =D
ReplyDeleteVery cute redo..love the style too. I have a chlak paint giveaway going on now..if you love to paint you must check this stuff out. Also, I see you are new to blogging. Every Monday I host a newbie party and would love to have you.
ReplyDelete@⚜ ↁℯℬℬᴵℰ⚜Hello! Thanks for stopping by, I would love to come to your party on Monday. Thanks for the invite!!
ReplyDeleteThat turned out really cute!
ReplyDeleteGreat post! Been reading about tips for painting this kind of furniture. Thanks for sharing!
ReplyDelete